
Reverse proxies can help a lot! I use them often to help make putting a certificate on a web application a lot simpler on myself, and having the ability to "ACME'fy" the app:
Here's a tip which could help solve a lot of headaches for you, sometimes. If you have a web app which expects you to use it to manage certs, so for example it provides you the CSR, and won't work with something like certbot, setup a reverse proxy using Nginx or Apache!
— Sean Wright (@SeanWrightSec) July 26, 2020
There are 2 common free web servers which you can use to accomplish this:
Each has their own strength's and weaknesses, so I will leave it up to the reader to do their own research and decide which one they prefer to use. Personally I find myself switching between the 2. But I will attempt to show how to do this for both in this post.
Apache HTTPD
Installation
The very first step is to install Apache HTTPD itself. There are several ways to do this, including downloading the binary (or if you are feeling really adventurous, you can try compile it from source) from Apache's website. However I would recommend that you rather install it via your OS's package management (apt for Debian based Linux distro's, and yum for RedHat based Linux distro's).
On Ubuntu run the following to install Apache HTTPD:
$ sudo apt install apache2For Ubuntu this installs all the Apache HTTPD modules which you require. For other OS's you may need to install them separately. The modules which you need are:
- mod-proxy
- mod-ssl
Configuration
Once you have installed the appropriate packages or files, you will need to configure the reverse proxy.
Firstly enable the mod-proxy Apache module:
$ sudo a2enmod proxy
$ sudo a2enmod proxy_http
Next up is to use certbot to get a certificate for your reverse proxy. Use the official certbot site to get the correct command to run for your OS. Select Apache as the option for software and select your OS:

Follow the installation instructions to install certbot on your system. For Ubuntu you can do this by running the following:
$ sudo apt-get install certbot python3-certbot-apacheNext get a certificate using cert bot:
sudo certbot --apache -d <domain-name>By default certbot will attempt to get a certificate from Let's Encrypt, but it is possible to run your own private AMCE server. I run my own server so the output of the command above is slightly different:
The final bit is to now configure the reverse proxy bit. Edit the file which is mentioned in the certbot output (in my example above it is /etc/apache2/sites-available/000-default-le-ssl.conf. Originally the file looks like:
<IfModule mod_ssl.c>
<VirtualHost *:443>
        # The ServerName directive sets the request scheme, hostname and port that
        # the server uses to identify itself. This is used when creating
        # redirection URLs. In the context of virtual hosts, the ServerName
        # specifies what hostname must appear in the request's Host: header to
        # match this virtual host. For the default virtual host (this file) this
        # value is not decisive as it is used as a last resort host regardless.
        # However, you must set it for any further virtual host explicitly.
        #ServerName www.example.com

        ServerAdmin webmaster@localhost
        DocumentRoot /var/www/html

        # Available loglevels: trace8, ..., trace1, debug, info, notice, warn,
        # error, crit, alert, emerg.
        # It is also possible to configure the loglevel for particular
        # modules, e.g.
        #LogLevel info ssl:warn

        ErrorLog ${APACHE_LOG_DIR}/error.log
        CustomLog ${APACHE_LOG_DIR}/access.log combined

        # For most configuration files from conf-available/, which are
        # enabled or disabled at a global level, it is possible to
        # include a line for only one particular virtual host. For example the
        # following line enables the CGI configuration for this host only
        # after it has been globally disabled with "a2disconf".
        #Include conf-available/serve-cgi-bin.conf


ServerName juice.smilingsec.com
SSLCertificateFile /etc/letsencrypt/live/juice.smilingsec.com/fullchain.pem
SSLCertificateKeyFile /etc/letsencrypt/live/juice.smilingsec.com/privkey.pem
Include /etc/letsencrypt/options-ssl-apache.conf
</VirtualHost>
</IfModule>
Edit the file and add the following after the line which includes Include directive:
ProxyPass "/"  "http://127.0.0.1:<port>/"
ProxyPassReverse "/"  "http://127.0.0.1:<port>/"
Where <port> is the port on which the service is running on. Finally restart Apache to allow the changes to take effect. On Ubuntu:
$ sudo systemctl start apache2You may also want to ensure that Apache automatically starts on system boot:
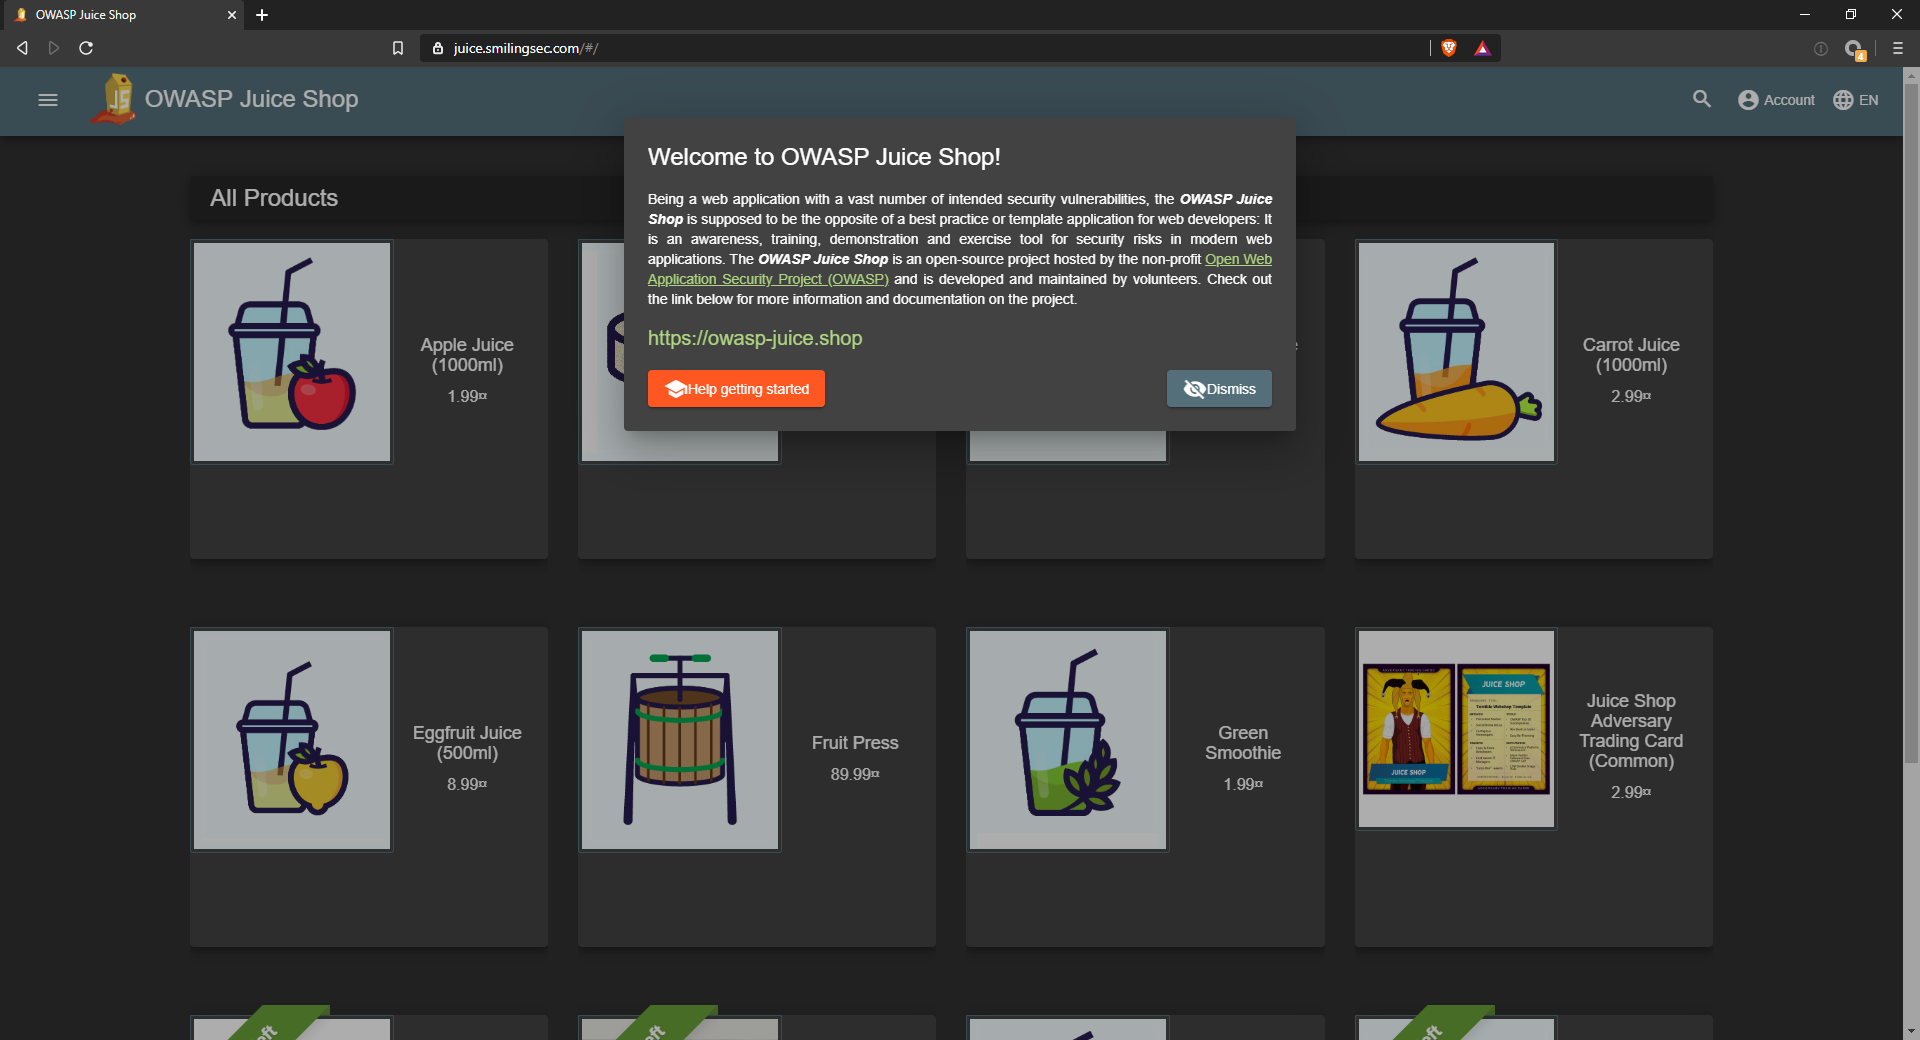
$ sudo systemctl enable apache2And finally make sure that it is working:
NGINX
Installation
The very first step for setting up NGINX as a reverse proxy is to install it! Again I highly recommend using your OS package manager (apt for Debian based Linux distro's, and yum for RedHat based Linux distro's) to install it. For Ubuntu run the following to install it:
$ sudo apt install nginxConfiguration
Next up is to use certbot to get a certificate for your reverse proxy. Use the official certbot site to get the correct command to run for your OS. Select Nginx as the option for software and select your OS:

Follow the installation instructions to install certbot on your system. For Ubuntu you can do this by running the following:
$ sudo apt-get install certbot python3-certbot-nginxNext get a certificate using cert bot:
sudo certbot --nginx -d <domain-name>By default certbot will attempt to get a certificate from Let's Encrypt, but it is possible to run your own private AMCE server. I run my own server so the output of the command above is slightly different:
swright@juice:~$ sudo certbot --nginx -d juice.smilingsec.com --server https://<redacted>/acme/acme/directory
Saving debug log to /var/log/letsencrypt/letsencrypt.log
Plugins selected: Authenticator nginx, Installer nginx
Enter email address (used for urgent renewal and security notices) (Enter 'c' to
cancel): <redacted>

- - - - - - - - - - - - - - - - - - - - - - - - - - - - - - - - - - - - - - - -
Please read the Terms of Service at None. You must agree in order to register
with the ACME server at https://<redacted>/acme/acme/directory
- - - - - - - - - - - - - - - - - - - - - - - - - - - - - - - - - - - - - - - -
(A)gree/(C)ancel: A

- - - - - - - - - - - - - - - - - - - - - - - - - - - - - - - - - - - - - - - -
Would you be willing to share your email address with the Electronic Frontier
Foundation, a founding partner of the Let's Encrypt project and the non-profit
organization that develops Certbot? We'd like to send you email about our work
encrypting the web, EFF news, campaigns, and ways to support digital freedom.
- - - - - - - - - - - - - - - - - - - - - - - - - - - - - - - - - - - - - - - -
(Y)es/(N)o: N
Obtaining a new certificate
Performing the following challenges:
http-01 challenge for juice.smilingsec.com
Waiting for verification...
Cleaning up challenges
Deploying Certificate to VirtualHost /etc/nginx/sites-enabled/default

Please choose whether or not to redirect HTTP traffic to HTTPS, removing HTTP access.
- - - - - - - - - - - - - - - - - - - - - - - - - - - - - - - - - - - - - - - -
1: No redirect - Make no further changes to the webserver configuration.
2: Redirect - Make all requests redirect to secure HTTPS access. Choose this for
new sites, or if you're confident your site works on HTTPS. You can undo this
change by editing your web server's configuration.
- - - - - - - - - - - - - - - - - - - - - - - - - - - - - - - - - - - - - - - -
Select the appropriate number [1-2] then [enter] (press 'c' to cancel): 2
Redirecting all traffic on port 80 to ssl in /etc/nginx/sites-enabled/default

- - - - - - - - - - - - - - - - - - - - - - - - - - - - - - - - - - - - - - - -
Congratulations! You have successfully enabled https://juice.smilingsec.com

You should test your configuration at:
https://www.ssllabs.com/ssltest/analyze.html?d=juice.smilingsec.com
- - - - - - - - - - - - - - - - - - - - - - - - - - - - - - - - - - - - - - - -

IMPORTANT NOTES:
 - Congratulations! Your certificate and chain have been saved at:
   /etc/letsencrypt/live/juice.smilingsec.com/fullchain.pem
   Your key file has been saved at:
   /etc/letsencrypt/live/juice.smilingsec.com/privkey.pem
   Your cert will expire on 2020-10-24. To obtain a new or tweaked
   version of this certificate in the future, simply run certbot again
   with the "certonly" option. To non-interactively renew *all* of
   your certificates, run "certbot renew"
 - If you like Certbot, please consider supporting our work by:

   Donating to ISRG / Let's Encrypt:   https://letsencrypt.org/donate
   Donating to EFF:                    https://eff.org/donate-le
The final bit is to now configure the reverse proxy bit. Edit the file which is mentioned in the certbot output (in my example above it is /etc/nginx/sites-enabled/default. Originally the file looks like:
##
# You should look at the following URL's in order to grasp a solid understanding
# of Nginx configuration files in order to fully unleash the power of Nginx.
# https://www.nginx.com/resources/wiki/start/
# https://www.nginx.com/resources/wiki/start/topics/tutorials/config_pitfalls/
# https://wiki.debian.org/Nginx/DirectoryStructure
#
# In most cases, administrators will remove this file from sites-enabled/ and
# leave it as reference inside of sites-available where it will continue to be
# updated by the nginx packaging team.
#
# This file will automatically load configuration files provided by other
# applications, such as Drupal or Wordpress. These applications will be made
# available underneath a path with that package name, such as /drupal8.
#
# Please see /usr/share/doc/nginx-doc/examples/ for more detailed examples.
##

# Default server configuration
#
server {
        listen 80 default_server;
        listen [::]:80 default_server;

        # SSL configuration
        #
        # listen 443 ssl default_server;
        # listen [::]:443 ssl default_server;
        #
        # Note: You should disable gzip for SSL traffic.
        # See: https://bugs.debian.org/773332
        #
        # Read up on ssl_ciphers to ensure a secure configuration.
        # See: https://bugs.debian.org/765782
        #
        # Self signed certs generated by the ssl-cert package
        # Don't use them in a production server!
        #
        # include snippets/snakeoil.conf;

        root /var/www/html;

        # Add index.php to the list if you are using PHP
        index index.html index.htm index.nginx-debian.html;

        server_name _;

        location / {
                # First attempt to serve request as file, then
                # as directory, then fall back to displaying a 404.
                try_files $uri $uri/ =404;
        }

        # pass PHP scripts to FastCGI server
        #
        #location ~ \.php$ {
        #       include snippets/fastcgi-php.conf;
        #
        #       # With php-fpm (or other unix sockets):
        #       fastcgi_pass unix:/var/run/php/php7.4-fpm.sock;
        #       # With php-cgi (or other tcp sockets):
        #       fastcgi_pass 127.0.0.1:9000;
        #}

        # deny access to .htaccess files, if Apache's document root
        # concurs with nginx's one
        #
        #location ~ /\.ht {
        #       deny all;
        #}
}


# Virtual Host configuration for example.com
#
# You can move that to a different file under sites-available/ and symlink that
# to sites-enabled/ to enable it.
#
#server {
#       listen 80;
#       listen [::]:80;
#
#       server_name example.com;
#
#       root /var/www/example.com;
#       index index.html;
#
#       location / {
#               try_files $uri $uri/ =404;
#       }
#}

server {

        # SSL configuration
        #
        # listen 443 ssl default_server;
        # listen [::]:443 ssl default_server;
        #
        # Note: You should disable gzip for SSL traffic.
        # See: https://bugs.debian.org/773332
        #
        # Read up on ssl_ciphers to ensure a secure configuration.
        # See: https://bugs.debian.org/765782
        #
        # Self signed certs generated by the ssl-cert package
        # Don't use them in a production server!
        #
        # include snippets/snakeoil.conf;

        root /var/www/html;

        # Add index.php to the list if you are using PHP
        index index.html index.htm index.nginx-debian.html;
    server_name juice.smilingsec.com; # managed by Certbot


        location / {
                # First attempt to serve request as file, then
                # as directory, then fall back to displaying a 404.
                try_files $uri $uri/ =404;
        }

        # pass PHP scripts to FastCGI server
        #
        #location ~ \.php$ {
        #       include snippets/fastcgi-php.conf;
        #
        #       # With php-fpm (or other unix sockets):
        #       fastcgi_pass unix:/var/run/php/php7.4-fpm.sock;
        #       # With php-cgi (or other tcp sockets):
        #       fastcgi_pass 127.0.0.1:9000;
        #}

        # deny access to .htaccess files, if Apache's document root
        # concurs with nginx's one
        #
        #location ~ /\.ht {
        #       deny all;
        #}


    listen [::]:443 ssl ipv6only=on; # managed by Certbot
    listen 443 ssl; # managed by Certbot
    ssl_certificate /etc/letsencrypt/live/juice.smilingsec.com/fullchain.pem; # managed by Certbot
    ssl_certificate_key /etc/letsencrypt/live/juice.smilingsec.com/privkey.pem; # managed by Certbot
    include /etc/letsencrypt/options-ssl-nginx.conf; # managed by Certbot
    ssl_dhparam /etc/letsencrypt/ssl-dhparams.pem; # managed by Certbot

}
server {
    if ($host = juice.smilingsec.com) {
        return 301 https://$host$request_uri;
    } # managed by Certbot


        listen 80 ;
        listen [::]:80 ;
    server_name juice.smilingsec.com;
    return 404; # managed by Certbot


}
Edit the configuration section starting with location / within the server configuration which contains the certificate configuration generated by certbot, and replace it so that it appears as follows:
    location / {
        proxy_pass http://127.0.0.1:<port>;
        proxy_set_header Host $host;
        proxy_set_header X-Real-IP $remote_addr;
        proxy_set_header X-Forwarded-For $proxy_add_x_forwarded_for;
        proxy_set_header X-Forwarded-Proto "https";
    }
Where <port> is the port on which the service is running on. Finally restart Apache to allow the changes to take effect. On Ubuntu:
$ sudo systemctl start nginxYou may also want to ensure that Apache automatically starts on system boot:
$ sudo systemctl enable apache2And finally make sure that it is working:

Conclusion
Reverse proxies can be a very efficient way to deal with some of the certificate complexities which some applications may introduce (such as their own certificate management process). So long as the web application is only exposed on the local interface (127.0.0.1 or the lo interface), the risks of not having HTTPS on the application itself are negligible. This also allows you to enable HTTPS for applications which may not even support HTTPS, or only support weak cipher suites and/or protocols.
I've also found this a great solution for instances where I create a systemd service, but the user doesn't have permissions to open privileged ports such as port 443.
A word of caution however, you may find you might run into some issues which attempting to map between different root directories (for example a request being made to hxxps://juice.smilingsec.com/ when the app root directory is /webapp). There are directive which you can use to help rewrite URLs to get around this issue, and this is going to very much depend on which application server you have chosen.
But overall I think that reverse proxies are great, and they have certainly helped me a lot of headaches and time in the long run. I've even managed to bolt on authentication to applications before by using this method!